Sunday, December 27, 2015

Granny's Modern Gingersanps

We called my Great-Grandmother, Granny. She raised three kids on a farm way up north in a small town called Sedro-Woolley. I have a lot of small memories of Granny. But what stands out to me most is when my family and I moved to a new house that was right around the corner from her. I remember walking down to see her before school in the mornings. We would sit at her round kitchen table and she would tell me about days past on the farm and what my Grandpa and Aunt Deanie were like when they were little. She would also revel in stories about when she was my age. No question of mine was left unanswered and I always felt special when she told me a funny story that none of the other grandkids knew yet.


At that time, I was writing a short story. It was just a hobby of mine, but she was convinced I should publish it. I was 10, and trust me the story was silly. But that's what I really loved about Granny. I knew that she loved me very much and thought I was good enough to do anything that I wanted to do. 


Granny passed away when I was a freshman in college. I wrote that reflection above right after she died. I found it the other day in my email when I was looking for her gingersnap recipe. She didn't cook much for us while when I was growing up, but this cookie recipe of hers was always my favorite. The recipe below is written in her handwriting....


Per usual, I'm taking a recipe and making a twist on it. This time, I'm updating Granny's recipe a little. Today's research recommends that Crisco is not very good for you. And I'm not saying this new recipe is GOOD for you .... but butter is not as likely to mess up your body as much. I took down the flour and the sugar a little too. So while this isn't quite true to what you see above, it is an homage to my Granny Bernice. I hope you like them!


INGREDIENTS

The dry (in a medium bowl)

  • 3.5 cups flour
  • 1 teaspoon baking soda
  • 1 heaping teaspoon cinnamon
  • 1 heaping teaspoon ginger (have some extra to roll the dough in)
  • 1 [even] teaspoon cloves
  • 1/8 teaspoon salt
The wet (in a large bowl)
  • 1 cup butter, @ room temperature  
  • 1 cup white sugar (have some extra to roll the dough in)
  • 1/2 cup brown sugar
  • 2 eggs, @ room temperature 
  • Scant 1/2 cup molasses 
  • 2 teaspoon vanilla extract 


DIRECTIONS
  1. Preheat your oven to 350 degrees F and line a baking sheet with parchment.
  2. In a medium bowl, sift together the dry ingredients.
  3. In a large bowl, beat together the butter and the sugars.
    The mixture should look fluffy. 
  4. Then, beat in the eggs, vanilla, and molasses to the butter-sugar mixture.
    Stir until just combined. 
  5. Next, slowly add in the dry ingredients to the wet. 
  6. This optional, but I would suggest chilling the dough for at least 20 minutes. 
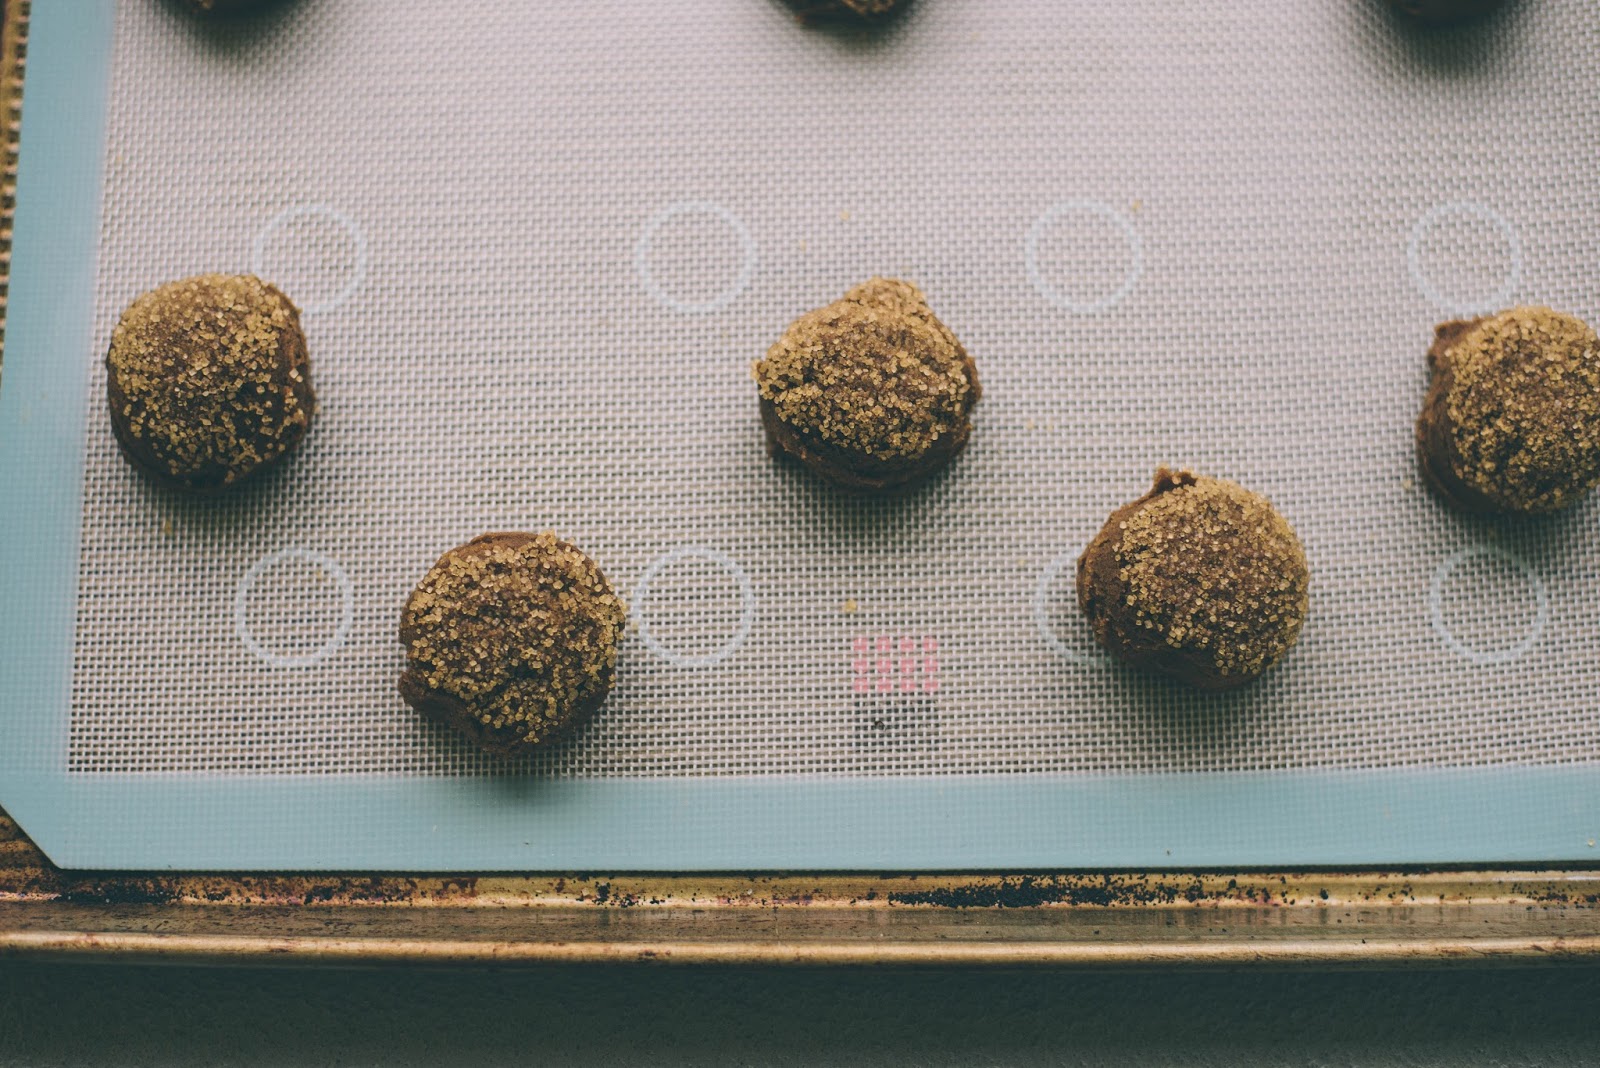
  7. Finally, using a cookie scoop, shape the dough and roll it in a sugar + ground ginger mixture. Place on the baking sheet and bake for 11-12 minutes.
  8. Cool completely. Serve with some green tea :)

Wednesday, December 16, 2015

Ethan's Favorite Cut Out Cookies + Matcha

Ethan isn't a man with much of a sugar tooth. I think I make up for both of us in that category. So it makes making baked goods disappear pretty tough around this house. He's a man of mild taste when it comes to sweets, and no other cookie can top his favorite list than his mom's famous cream cheese cut out cookie recipe. 


But who can resist trying to one-up a classic?
I can't.  

I thought Santa would appreciate some caffeine with his cookies to boost his energy during that long flight. So I added some green tea matcha powder* to the Diana's popular batter...and maybe some cinnamon too. (Surprised? Me neither.) Forgive me, Ethan! I know this one had you skeptical... but your sister sure did love the idea :)

*You remember matcha, right? If not, check out my recipe for Chocolate Matcha Energy Balls. You can find matcha at PCC or Whole Foods. It's not only AWESOME for naturally dying things, but it's also pretty awesome to drink and bake with. You really can't taste the green tea, but it sure makes the cookie turn a beautiful new color without using frosting.

Looking for a twist on an old classic? These mild, green-tea sugar cookies are surely the ticket amidst the sugar blizzard we call December. 

Let's get on with the recipe, shall we?


 INGREDIENTS 
THE WET (cream together using electric mixer):


  • 1 cup butter
  • 1.5 cup sugar
  • 2 eggs
  • 8 ounces cream cheese 
  • 4 tablespoons yogurt 
  • 1 tablespoon vanilla 
THE DRY (whisk together or sift):
  • 4 cups flour 
  • 2 heaping teaspoons matcha (optional)
  • 1.5 teaspoons cinnamon (optional)
  • 0.25 teaspoon baking soda
  • 1 teaspoon baking powder 
  • 0.75 teaspoon salt
  • Raw sugar for topping
DIRECTIONS
  • In a large bowl or mixer, blend the butter and sugar until fluffy. Add the eggs. Stir until just combined. 
  • Mix in the cream cheese, yogurt and vanilla. 
  • Next, slowly add the dry ingredients you have already whisked together in a medium bowl to your wet ingredients. 
  • Chill the dough for at least an hour
  • Preheat oven to 350 degrees F and line baking sheet with parchment
  • Then, roll out the dough and cut it into shapes using a cookie cutter. Top with raw sugar (optional)
  • Place on cookie sheet and bake for 11-12 minutes


Enjoy!
Eat well! 
Be well!
Follow by email below!
Merry Christmas :)


Sunday, December 6, 2015

Cinnamon Chocolate Chip Cookies

This foodie road of mine began with one specific recipe. Today, I share it with you. Just in time for the holiday season. 


Enter the extra cinnamony, chocolate chippity, cookie. When I was in college, cookies were the only thing in the kitchen I felt really confident making. And growing up, if I was stressed out or sad my mom would make me some cookies to feel better. Looking back, it may have not been the best way to deal with tough times, but nonetheless, cookies are my always go to comfort food. SO, as may be able to deduce, I made a lot of cookies in college, especially for my friends.

One night, I decided to make my own recipe. And that is when I discovered I am in LOVE with cinnamon. Trust me everyone, double what the recipe tells you when it comes to cinnamon from now on. You'll be surprised at how much more flavor you'll start to notice....

Also, cinnamon is super good to have in your life. Check out these sources:
Authority Nutrition
Health.com


HA! I just convinced you that these cookies are good for you.... Reality check, there's still a butt ton of sugar and butter in these babies ...  because I love you.
Let's get on with the recipe, shall we?

INGREDIENTS
Dry
  • 2 cups flour (quinoa flour works great too!)
  • 3 heaping tsp cinnamon
  • dash of nutmeg
  • 1/2 tsp salt
  • 1/2 tsp baking soda
Wet
  • 1 cup butter
  • 1/2 cup white sugar
  • 1 cup brown sugar
  • 1 whole egg + 1 egg yolk (how to separate a yolk)
  • 1 tablespoon vanilla
  • 1.5 cups chocolate chips (add in white chocolate chips for different texture and taste)

DIRECTIONS
  • Dump all of the dry ingredients in a medium bowl. Whisk with a fork to combine. 
  • In a large bowl or your Kitchen Aid, whisk together the butter and sugars. Stop when the mixture looks fluffy. Add the eggs and vanilla. Stir to combine. 
  • Then, slowly start adding your dry ingredients to your wet ingredients. 
  • Once combined, grab a spatula and stir in the chocolate chips. 
  • Refrigerate your dough for 30 minutes. Preheat your oven to 325 degrees F. Line a baking sheet with parchment or slip mat. 
  • Now, the reason why these cookies are to die for is because of this next step. Put your cookie scoop down and grab a 1/4 cup measure. 
  • Use a 1/4 cup measure to scoop the dough out onto the baking sheet. 
  • Bake for 17-18 minutes. Cool completely before enjoying. Unless you like a gooey mess...then go for it. 

And there you go! That is my most secret, most favorite recipe. I hope you enjoy the cinnamon! Merry Holiday Season, everyone!

Follow by email! Enter your email below and never miss an update :)

Sunday, November 29, 2015

Pumpkin Scones


I woke up last Sunday morning feeling like a lazy morning in bed was highly needed. But, I also found myself with an itch to make something new. Scones were calling my name. And they needed to feel like late autumn. So I grabbed the canned pumpkin from our laundry room / pantry and decided some dried cranberries would be a great addition too. 

Between the raw sugar sprinkled on top to the soft morning window light streaming through the bedroom, that Sunday morning couldn't be beat. 

Now it's time for you to have an adventure and then take a load off.


Pumpkin Scones
*Adapted from America's Test Kitchen 


INGREDIENTS

  • 2 cups flour
  • 3 tablespoons sugar (plus some raw sugar for dusting on top)
  • 1 tablespoon baking powder
  • 1/2 teaspoon salt
  • 5 tablespoons chilled unsalted butter, cut into 1/4 inch pieces 
  • 3/4 cup dried cranberries 
  • One 15 ounce can pumpkin 
DIRECTIONS
  • Preheat the oven to 450 degrees F and line a baking sheet with parchment 
  • Get your food processor out, pulse the flour, sugar, baking powder, and salt together for about 3 pulses. 
  • Scatter the butter in the processor and pulse the mixture until it looks fine like cornmeal. 
  • Transfer your mixture into a large bowl and add the dried cranberries. 
  • Stir in the pumpkin using a spatula until the dough just begins to form. 
  • Flour a surface on our your counter. Turn out the dough to that surface and knead until it forms a rough, sticky ball. 
  • Mold the dough into a 9-inch cake pan. Pop it out, and get a large, sharp knife out. Cut the dough into 8 wedges. Lightly sprinkle the wedges with some raw sugar.
  • Place the wedges on your baking pan and bake for 12-15 minutes. Should be golden brown. 
ProTip: wait until the scones are completely cooled until eating. The flavor is better that way!


Here's to more lazy Sundays ahead.
Cheers!

Sunday, November 22, 2015

DIY Cauliflower Fried Rice


I've been reading this awesome book about dieting, food, and why we eat what we eat called,"The Foodist". Essentially, Darya's argument can be summed up with this picture....


Darya is a food writer (check out her blog, the Summer Tomato here), she is a neuroscientist, and an overall smart lady. Her book pretty much tells you to be patient with yourself, but you need to start eating REAL foods. It starts with veggies and clean protein, beans, quinoa, etc... And though that may sound completely tasteless and boring. It doesn't have to be! Darya explains that if you buy FRESH produce when it's in SEASON and close to home, those veggies taste like heaven. And once you allow yourself to learn a few easy ways to prep those fresh foods, you'll never want to go back to that processed stuff. 

Now, enter my take on on a take-out classic: chicken fried rice. Here's the catch though....there's absolutely NO RICE in this dish. 


All you need is a food processor to pull this recipe off. If you don't have one, may I strongly encourage you to get one? I haven't used one until recently, and now it feels like my left hand. You can chop veggies with ease, combine flour and butter to the right cornmeal texture, and so much more... 

The cauliflower is chopped and shredded in the food processor. After that, all you have to do is fry it in your wok along with the other ingredients, and it takes on a texture very similar to a grain like quinoa. It's really good! See how to do it yourself here, thanks buzzfeed!

Ready to make it yourself? Here's what you do:


INGREDIENTS:

  • 1 head cauliflower, shredded in food processor 
  • 2 cups brussel sprouts, shredded in food processor 
  • 1 cup edamame 
  • 2 heads broccoli
  • 1 onion, diced
  • 2 cloves garlic, minced 
  • 1 serrano chile, sliced and divided 
  • 1 tablespoon olive oil or sesame oil 
  • 2 eggs
  • 1 cup soy sauce
  • 2 large chicken breasts
    • season the chicken with salt, pepper, chile powder, tumeric, coriander, and ground mustard (to your liking) 
DIRECTIONS:
  • Chop and prep all your veggies first. Cut up your chicken into bite sized chunks. 
  • Heat up your wok over medium heat with 1/2 tablespoon olive oil with 1 clove garlic and 1/2 of your serrano chile. Once fragrant, brown your chicken. About 5 minutes. Then take your chicken out and set aside. 
  • Put your wok back over medium heat with the other 1/2 tablespoon oil, garlic, and serrano. Stir fry your onion for about 2 minutes. Then add the broccoli. 
  • The broccoli will need to stir fry the longest. Let it cook with the onions for another 5 minutes. Stirring constantly. 
  • Next add the edamame. Cook for another 3-5 minutes. The veggies should look really vibrant in color. 
  • Now add your brussel sprouts. Stir fry for about a minute and then add the shredded cauliflower. Let it cook and gain some color. For about 3 minutes. 
  • Add the chicken and soy sauce, combine thoroughly. 
  • Push your stir fry mixture to one side of your wok. Crack the eggs in the newly opened space in the pan, scramble in the pan. Once cooked through, combine the eggs with the rest of the mixture. 
  • Salt, pepper, and season how you see fit. I added coriander, chile powder, ground mustard, and salt throughout the entire cooking process. 
  • Serve with siraccha. I also added salted sunflower seeds to my own plate, which was surprisingly delicious. 

Trust me, you may never go back to that old take out stuff. Your mouth is going to be opened up to some amazing flavors in this dish. And it's mostly just veggies! Yummy!


Did you make this dish? Snap an instagram pic and tag me @karenleannkirsch 
Eat well! Be well! 
And follow by email below :)

Monday, November 16, 2015

DIY Cranberry Bliss Bars

I just realized after doing my post about Salsa, how COOL it is to do things yourself. Why buy salsa from the store when you really have no idea what's in it? Why buy something that is SO easy to make yourself? So, be ready folks. You may find a new series has developed over here at Karen's Place, and it's called 'DO IT YOURSELF!' 

Okay, as you can tell by all the CAPS, I'm excited about this idea. And here's the next installment. 


I have been spending a lot of time in Starbucks lately. Not because I especially love their coffee. It is because in the new suburb digs I live in, that's the only coffee house they will accept. Also, it is not because I MUST have coffee made by someone else. The real reason is that I have no internet in my new place, currently. Hopefully that is going to change this week, and then I'll be back to blogging at home. 

So, since I have been blogging and editing from a Starbucks for the last two months. I found myself there last week while I made the Salsa post. Just as I am doing the same now for this post. And while I drank my Americano from a controversial red cup, I noticed that the change of cups also brought also a change in the drinks and snacks menu. Next to the egg nog lattes and other sugary excuses for coffee, there it was...my favorite indulgence... the beloved Cranberry Bliss Bar. 

I was so excited that I almost went back to the counter to order myself one. But then I realized. I could totally do this myself. It's really just a blondie with cranberries and cream cheese frosting. So after I finished last week's post, I found a recipe I liked, thought about changes I would make, and went to the store. 


And you can make it too! This recipe is really, really good. It's sweet, and definitely an indulgence. But save your $3.75, make this for yourself and share the rest with friends and family this holiday season.  

Cranberry Bliss Bars
Adapted from Food.com


INGREDIENTS
(for the bars...)2 sticks butter, softened
  • 2/3 cup brown sugar
  • 1/3 cup white sugar
  • 3 large eggs, at room temperature 
  • 3 teaspoons Orange extract
  • 1 tablespoon Vanilla extract
  • 2 cups flour
  • 1.5 teaspoons baking powder
  • 1 teaspoon ground ginger (freshly grated would be fantastic, too)
  • 1 cup dried cranberries
  • 1/2 cup white chocolate chips
  • 1/2 cup finely chopped hazelnuts 
(for the frosting)
  • 1/2 cup cream cheese
  • 2 tablespoons butter, softened 
  • 2.5 cups powdered sugar 
  • 1 teaspoon orange extract
  • 2 teaspoons vanilla extract
  • Splash of milk, if needed (aka...if the frosting is too thick)
(for the topping)
  • 1/2 cup chopped dried cranberries 
  • Lemon zest from 1 lemon 
  • 1/3 cup melted white chocolate chips (add a capful of vegetable oil when melting)


DIRECTIONS

Preheat the oven to 350 degrees (325 for a glass or dark pan). Prepare a 9x13 by lining it with parchment paper or use a non-stick spray.
  • BARS: Beat together softened butter and sugars 3-5 minutes until light; gently blend in eggs and the extracts. Add the flour, baking powder, and ginger and beat briefly. Add the cranberries and chips, stirring just until incorporated.
  • Spread thick batter in prepared 9x13 pan. Bake 350 for 24-28 minutes until light brown at the edges. Cool completely. 
  • FROSTING: Blend cream cheese and butter until fluffy. Add the extracts and confectioners sugar and beat until frosting is fluffy and spreadable (adding 1 t. milk if needed). Spread evenly over COOLED bars.
  • GARNISH: Zest your lemon over the bars. Chop 1/3 cup dried cranberries coarsely; sprinkle over frosted bars. If you have leftover hazelnuts, I'd sprinkle those over everything, too!
  • DRIZZLE: Mix white chocolate and oil in a glass measuring cup. Microwave 1 minute; stirring every 15 seconds until melted. Use a fork or whisk to drizzle the white chocolate diagonally across the bars.

Get some coffee in your cup and enjoy these babies!
Follow me on instagram @karenleannkirsch 
Follow by email below!


Wednesday, November 11, 2015

DIY Salsa

Some days I truly believe that my main source of vegetables comes from salsa. There are nights when I sit down and graze over chips and salsa until I realize it has now become my dinner. Needless to say, I think chips & salsa are one of my main food groups. #thatadultlife

The other day, I opened up my fridge and realized that we were all out of salsa. Though I only live a block away from the grocery store, I was in anguish! Ha, not really. But that's all that sounded good to me. But then I realized, my sister Amy has this amazing recipe for salsa that she learned in her 10th grade Spanish class. Why have I never made it myself?!

So I texted her for the recipe. And today I am sharing it with you, because I had forgotten how GOOD it was. I really don't think I'll go back to the store-bought kind. It literally takes less than 10 minutes to make, and you get to use an that immersion blender of yours that just sits in the cupboard 364 days of the year. How cool is that? :)

Let's go! DIY Salsa, just for you.


INGREDIENTS:

  • 28 ounce can diced tomatoes 
  • 1 medium onion, diced
  • 1 small diced green chiles 
  • 1 small can diced jalapeños
  • 2 cloves garlic
  • 1 fresh serrano pepper (optional) 
  • Handful of fresh cilantro, chopped
  • Juice of 1 lemon (or lime)
  • Salt to taste
DIRECTIONS:
  • Dump the first 6 ingredients into a big bowl and combine using an immersion blender. You can just use a regular blender too. 
  • Last, season with lemon juice and salt to your liking.
  • Then give it a stir with a tortilla chip, and another...and another...
*Note from Amy: "Oh, and, I tried it with fresh ingredients instead of canned once, but it wasn't the same. The flavors didn't blend as much. And it gets spicer a day in the fridge. I think that's all now :)"


ENJOY!! And follow by email below :)

Sunday, November 1, 2015

Greek Pepper Stew

The funny thing about cooking is that when you find something you like it ends up falling into some kind of familiar rotation. On Tuesdays you have Tacos, Wednesday is a Pasta Salad, and every other night is Chicken and Roasted Veggies. Seems like a good plan, no?

I say NOT! It's fun when you master certain dishes. But, where is the fun in doing the same old thing week after week? That is why I love pinterest and I ADORE cook books. They are never-ending resources for inspiration, challenge, and deliciousness. 

Most of the time, I don't even follow the recipe. I look at the name and the picture and then I begin an adventure of my own. That's why I made this blog, and that's why I do what I do in the kitchen. Cooking is like any other kind of art form. You grab the ingredients you want to make your own symphony or masterpiece of flavors. 

That's how this week's recipe was born. I was flipping through a Greek inspired cook book when I came across an Autumn pepper stew with chicken sausage. I read through the ingredient list and instructions, and then quickly found myself walking through Trader Joe's. I went through the recipe over and over in my head, taking the parts from the book that seemed most necessary and adding the ingredients I think would be a fun twist of my own. And as you read this, I encourage you to do the same. Make it yours!

So here it is, the Greek Pepper Stew. Believe it or not, it's very light while also being extremely hearty and healthy. It's a perfect companion as you welcome cooler, darker nights, and makes for a great lunch the next day. 


INGREDIENTS
  • 2 tsp olive oil
  • Shallot, diced 
  • 1/2 white onion, diced
  • 2 garlic cloves, minced 
  • 3 peppers 
  • The juice of 2 lemons, divided 
  • 4 chicken sausage links, chopped
  • 1 can cannellini beans
  • 8 ounces chicken broth
  • 16 ounces stewed tomatoes 
  • 1 cup kalamata olives, diced 
  • 1/4 cup flat leaf parsley 
  • Herbs de provence, salt, pepper, to taste
  • Feta cheese for topping
  • 1 cup cous cous, cooked (Optional for serving) 
DIRECTIONS
  • Get a large soup pot or dutch oven out. Heat the olive oil over medium high heat. 
  • Sauté shallot, onion, garlic until fragrant and translucent (about 5 minutes).
  • Add the diced peppers, sauté for another 5-7 minutes. The peppers need to be soft. 
  • Add the juice of 1 lemon, the parsley, herbs, salt and pepper. Sauté for another minute.
  • Add the sausage (mine was already cooked), cook for 2 minutes
  • Add the drained beans, cook for another minute
  • Then add the chicken broth and bring to bubble. Be sure to scrape the bottom while you wait. This is akin to deglazing the pan!
  • Add the tomatoes and wait until it boils. Then add the olives. Turn down the heat to medium and cover. Simmer for 15-20 minutes. 
  • Top everything with the juice of the second lemon and stir.
  • You can serve this hearty stew over a bed of cous cous and top it off with some feta. Delish! 


Did you make this meal? How did it turn out? What did you change? Let me know on Instagram by tagging me: @karenleannkirsch

:) Eat well! Be well! And follow by email by adding yours below!

Sunday, October 25, 2015

Quick Chicken Pozole


When I am in a cooking rut, our dinners at home really start consisting of one thing: quesadillas. I think you all have heard me rant about this before, so I'll keep this rant short. I love quesadillas and ruts happen in the kitchen. I used to really worry about it, especially putting out this blog every week. What will people think of me? Am I some kind of poser? 

Nope! Not at all. And neither are you, my friend. Let me reiterate: Ruts in the kitchen happen. And for me, with all the rich content out on the internet these days, it's hard to keep up on pushing out fresh ideas every week.  Sometimes we need ruts for creativity to cultivate. I call it a resting period. A time to rest my mind and keep it open. 

So this week, I want to share with you a dish that is a spin on my old dinner staple: Pozole. It's a perfect pairing for my beloved quesadilla, and helps mix things up when I find myself in that no-mans land of creativity.  


It's quick, it's easy, and it is a sure-fire crowd pleaser. Let me reemphasize the it's EASY portion of this, especially if you have some left over chicken and veggies laying around....which I always do. Pozole is one of my absolute favorite soups. You can top it with fresh ingredients, it's so simple, and so filling. 


So let's get down to business, here's what you do:


INGREDIENTS

  • 3 garlic cloves, minced
  • 1 onion, chopped
  • 2 teaspoons olive oil
  • 1.25 pounds shredded chicken (already cooked)
  • 2 teaspoons oregano 
  • 1 teaspoon cumin and chile powder
  • Salt, pepper, and fresh lime juice to taste
  • 1 four ounce can diced green chiles

  • 1 regular sized can of enchilada sauce 
  • 2 cups chicken broth
  • 16 ounces hominy (you'll find it in a can in the "Mexican" aisle of your grocery store)


DIRECTIONS
  • Get your large soup pot out, heat the oil over medium high heat and sauté the onions and garlic
  • Once translucent, add the green chiles. Sauté for about a minute. Then add the oregano, cumin, salt, pepper, and chile powder. Sauté for 1 more minute. 
  • Turn the heat to medium, and start adding the rest of your ingredients: stir in the chicken, add the enchilada sauce, and the hominy.
  • Cover and turn up the heat to medium high again. Cook until it boils, then serve it up!
  • Garnish with fresh radish, tomato, sour cream, lime, shredded lettuce, tortilla chips, etc. !! 


And enjoy! As always, eat well! Bell well! And subscribe by email below to always be in the loop with Karen's Place :)

Sunday, October 18, 2015

Stella's Fluffy Raspberry Frosting

One year for my birthday, Ethan surprised me with a cake he had made on his own. It wasn't anything special. But then I looked at the frosting. It was the fluffiest frosting I have ever seen. I took a big bite, and was immediately hit in the mouth with a flavor and texture I had never had before. It tasted like raspberry, sweet air! 

I couldn't believe it, and totally fell in love. So of course, I peppered Ethan with a million questions about what I was eating. 

Ethan's great grandma, Stella, concocted this recipe a long, long time ago. Ethan told me it was one of his fond memories of her, making it together. So whenever we have a special occasion, or just trying to WOW our friends, we make this frosting. 

We recently made it for my parents we they came over for dinner, and my mom said that I just HAD to share it with you all. So here you are, my dears. Great Grandma Stella's fluffy raspberry frosting :)


INGREDIENTS

  • 1 cup raspberries 
  • 7/8 cup sugar (we usually just do a little less than 1 cup)
  • 1 egg white
  • 1/4 teaspoon cream of tartar 

DIRECTIONS
  • Combine all the ingredients using a  mixer on high speed. Keep the mixer going until the egg white combines with the raspberries and the mixture becomes EXTREMELY fluffy! This will take between 5-10 minutes, depending on the strength of your electric mixer. It should triple in size. 
Can you believe it? It's that easy! And it is by FAR my favorite frosting of all time. Be aware, it'll probably make way more than you need. It keeps pretty well in the fridge for about a week. We haven't tried halving the recipe, but I don't recommend it. Just be ready to eat it with a spoon for one of your late night cravings :)


P.S.
See that follow by email right at the bottom of this page? Enter your email and hit enter! Then you're subscribed to Karen's Place, and you'll never miss an entry -- it'll come straight to your inbox ;)

xoxo,
Karen

Sunday, October 11, 2015

Falling into Autumn -- Spicy Chocolate Chocolate Chip Cookies

Some people really love their pumpkin spice when the leaves starting turning colors. I don't quite know what it is, but let me tell you - there is so much more to life than pumpkin spice! As for me, I have always been a huge cinnamon fan. And recently, I have been opened to the world of cardamom. Put these two together and you've got an unbeatable combo!

With the cooler weather, slowly trickling in, the days are getting shorter and soggier. You have a day off, and what sounds better than some warm cookies and a good movie? Add a blanket and you've got the workings of a perfect day. 


Oh, and did I tell you I make the BEST cookies around? They were my speciality back in college.  I found one recipe and have reworked it over the years, adding my own favorite flavors, mixing it up for different styles - you know, the usual!

Well here's one variation of the best cookie recipe around to help you settle into Autumn and WOW your friends. Here are my Spicy Chocolate Chocolate Chip Cookies. And when I say spicy...I mean spice! Not hot!

Get that butter and those eggs to room temperature! And enjoy!

INGREDIENTS

  • 2 cups chocolate chips

DRY - in a medium bowl
  • 2 cups flour
  • 3/4 cup dutch cocoa 
  • 1 teaspoon baking soda
  • 1 teaspoon salt
  • 2 teaspoons cinnamon
  • 1/2 teaspoon cardamom
  • 1/2 teaspoon nutmeg
WET - in a large bowl
  • 1 egg (whole)
  • 1 egg yolk
  • 1 cup butter (2 sticks)
  • 1 cup brown sugar
  • 1/2 cup white sugar 
  • 1 tablespoon vanilla


DIRECTIONS
  • Preheat the oven to 325 degrees F
  • Line a large baking sheet with parchment paper
  • In a medium bowl, combine all of the dry ingredients. Use a whisk to combine. 
  • In a large bowl, combine the butter and the sugars using a mixer on high speed. Whip them together for about 1 minute until the butter and the sugar look fluffy.
  • To the butter and sugar mixture, add the eggs and vanilla. Stir slightly, until just combined.
  • To the wet ingredients, add the dry ingredients in portions. You don't want flour going every where! 
  • Once the wet and the dry ingredients are combined, using a spoon, add the chocolate chips. 
  • Using a cookie scoop, spoon, or 1/4 cup measure, scoop out the dough onto the baking sheet.
  • Cook for 12-14 minutes. Cool. And eat them all up.

Subscribe by email below, and never miss a beat!
-Karen

Sunday, September 27, 2015

IPA Slow Cooker Chicken

Like I've said a million times, Ethan and I moved recently. This one felt like a big one to us. I moved into our Seattle basement while he was still finishing up an internship in Utah. So this move to Sammamish was the first time we were moving our stuff together at the same time to the same place. It felt very grown up. I got rid of a lot of my stuff before the move to help balance out space usage. And I got really into it! I don't know why, but donating and throwing away the things that I just didn't use any more felt very freeing. 

So anyway, when we moved in to the Sammamish house in the sky, I felt like everything we had in the place was exactly what we needed. But then I noticed these 2 IPAs in our fridge that had gone unopened since May. Ethan had been drinking one during the move, but didn't finish it. So I asked him if he liked it. He did not. 

I hate IPAs. Literally. I am not a real PNWer for saying this, but I truly think the taste latches onto your taste buds and takes the taste of anything else you are ingesting away forever. Long story short, these two fridge space hogs had to go. And I needed a new slow cooker recipe. And boom! It hit me. Goodbye yucky IPA! Hello delicious, moist, new chicken recipe!


INGREDIENTS
  • 4 chicken breasts
  • 1 onion, sliced
  • 2 garlic cloves, minced 
  • 2 bottles or 24 ounces IPA beer
  • 1/2 cup sweet chili dipping sauce
  • 2 tablespoons apple cider vinegar
  • 1 teaspoon chili powder
  • salt and pepper to taste
DIRECTIONS
  • Put all the ingredients into a slow cooker and set on low
  • Cook for 8-10 hours
  • Serve over rice or lettuce, add siracha or hot sauce for an extra kick!

Sunday, September 20, 2015

Fresh Zucchini Waffles


It's Saturday morning. Growing up, I'd wake up early, turn on some Saturday morning cartoons, and go to the kitchen. There I would find my dad rummaging through the cupboard, and prepping the counters with bowls and ingredients. He was in charge of pretty much everything, but I was the master stirrer of the dry ingredients and the homemade maple syrup.

Saturday mornings only meant one thing in my house: waffles. 

This morning, I woke up in a new house. 
I have a new kitchen and a fridge full of groceries, thanks to wonderful friends and family. So for my first Saturday in my new home, I thought it would only be fitting to make some waffles using my dad's recipe. But of course, I added a twist! Ethan's mom's garden has bloomed in the hot Seattle summer, and along with a dozen pears and apples, she gave us two huge zucchini. So I thought to myself, "Zucchini Waffles would be good."

And boy, they sure were. Soft in the middle, crunchy on the outside. Slab on some peanut butter and a little bit of syrup, and you've got yourself one special breakfast.


INGREDIENTS
  • 1 small zucchini (or 1/2 of a large one), grated & drained
  • 1.75 cup flour
  • 1 tablespoon baking powder 
  • 2 dashes salt 
  • 2 teaspoons cinnamon
  • 1.75 almond milk
  • 0.5 cup vegetable oil
  • 3 eggs, yolks and whites separated 
DIRECTIONS
  • Using a cheese grater, grate your zucchini. Place it in a strainer and set something heavy on top of it. Let the zucchini drain for about 30 minutes. 
  • Get your waffle maker heating on high. Make sure to spray it with some non-stick spray!
  • Separate the egg whites, beat them until they turn white and start to form peaks. 
  • In a separate, large bowl, mix together the egg yolks, oil, and milk
  • In a medium bowl, mix together the dry ingredients. 
  • Add the dry ingredients to the yolk, oil, milk mixture. Mix until almost smooth. You want lumps! Then add the grated zucchini.
  • Finally, to the large bowl, add the egg whites slowly and fold them in. Do not over mix. Your batter should look bubbly. 
  • Once your waffle maker is ready, use a 1 cup measure and spoon in the batter. Cook until golden brown!
Enjoy!
And subscribe by email below for more fun :)


Tuesday, September 15, 2015

Southwest Quinoa Salad

Well, I’m back people and ready for action. I know it’s been a little while, but if you have read my last couple posts, you’ll know I’ve gone through some changes these past couple months. Luckily, I’m all settled into my new apartment, watching Gilmore Girls, and wasting no time in the kitchen. As I type, I have an amazing David Lebovitz pear cake in the oven.

Check it out!
But there's more to this story... we're here for some quinoa!

We now live on the top floor; the kitchen is twice as big and a million times lighter than the basement cave in Seattle. It’s a dream come true for me! Anyway, I took a couple days off work to get settled. Ethan is, unfortunately, way behind at work. So last night, we recreated one of our old dates. When Ethan was in grad school, the only time I could really see him was at dinner. So while he studied, I cooked, and for the amount of time it took to eat, we got to have some real face time. And so, I made a makeshift picnic and brought dinner to him at work.

I needed something that would be easy to carry, not need a lot of utensils, and packed with protein and veggies to keep Ethan burning the midnight oil. And so we ate this awesome Southwest Quinoa Salad over a patient table while the Vikings/49ers game played in the background. Romance at it’s finest if I do say so myself!

This grain salad is easily packed for a lunch, made into a vegetarian meal, or a great dish to bring to a potluck. I’ve modified the recipe to meet Ethan’s meat needs, you can find the original recipe in Wendy Polisi’s cookbook, The quintessential quinoa cookbook. Thanks Wendy! (And thanks #bae for getting it for me!)


INGREDIENTS:
  • 1 ½ cups roasted chickpeas (drain & rinse them first!)
  • 1 cup corn (fresh is best!)
  • 1 red pepper, seeded and diced
  • 1 yellow pepper, seeded and diced
  • 2 tablespoons taco seasoning
  • 2 tablespoons JOES seasoning (or chili powder)
  • 2 tablespoons lime juice
  • 2 tablespoons soy sauce
  • 2 cups cooked quinoa
  • 1 pound ground beef, cooked
  • 1 large tomato, seeded and diced
  • 1 green chile pepper or jalapeno, seeded and diced
  • 2 tablespoons cilantro
  • 2 tablespoons lime juice
  • 1 teaspoons agave nectar


DIRECTIONS
  • Cook the quinoa (good trick is to use your rice cooker!)
  • Preheat the oven to 400 degrees F
  • Combine the chickpeas, corn, red & yellow peppers, seasonings, lime juice, and soy sauce and place on a baking sheet lined with parchment paper.
  • Roast chickpea mixture for 45 minutes, stirring often so as not to burn veggies
  • Cook the ground beef with some Joe’s and garlic powder until there is no pink. 
  • In a large bowl, combine the lime juice and agave nectar. Add the quinoa, beef, tomatoes, chile pepper, cilantro, and chickpea mixture and toss!
  • Top with cojita cheese or feta and you are in for one delicious meal :)

Sunday, August 30, 2015

Span"ish" Egg Bake

Oh, my dear friends. I miss you! So here's what has happened this summer:
  • I turned 25
  • I quit my job
  • Ethan and I participated in our 2nd triathlon together (my 3rd total)
  • I started a new job
  • We are moving back to the east side in two weeks
As you my surmise, the blogging has gone by the wayside a little. And boy have I missed it. Luckily, I have a lot of ideas stewing, a bigger kitchen to look forward to, and many more friends to introduce you to! Bare with me as I finish out some things this summer. My blogging may be a little sporadic until I find my new normal again.

Welcome to my Span"ISH" Egg Bake. An idea that has been baking in my mind for a few weeks, but I just haven't had time to test it out. It's part American casserole and part Mexican breakfast chilaquiles. AND ALL TOO DARN DELICIOUS. This the epitome of wholesome cooking in my book. Great flavors and nutritious ingredients combined into one mind blowing bite. ENJOY!


INGREDIENTS
  • 4 eggs, scrambled 
  • 1 tablespoon butter
  • 1/2 onion, diced
  • 1 bell pepper, diced
  • 1/2 cup black beans
  • 1/2 cup salsa, chunky!
  • 3 large tortillas (corn or flour)
  • 1/2 cup cheese, grated
  • 1 cup fresh spinach, chopped
  • Salt & Pepper, to taste
  • 1 clove garlic, minced 
  • 1 tsp chile powder
  • 2 tsp dried oregano 
DIRECTIONS
  • Sauté onion and peppers with spices and garlic 
  • Scramble the eggs and add a dash of oregano 
  • Melt the butter in a pan over medium heat, lower the heat to medium low, and cook the eggs
  • Preheat your oven to 400 degrees 
  • Grab a pie dish and spray with cooking spray 
  • Once the eggs are done, your vegetables are chopped, start layering your ingredients
    • Tortilla
    • Onion / pepper 
    • Beans
    • Salsa
    • Eggs
    • Spinach
    • Cheese
    • Repeat 1 more time and top everything with the final tortilla and remaining cheese 
  • Serve with sour cream, hot sauce, extra salsa on a slow Sunday morning and enjoy :)