Monday, July 27, 2015

Sourdough blueberry pancakes

I took a tiny break from posting! Hope you didn't miss me too much. Lots of projects are filling up my free time, which are exciting and time consuming. I celebrated turning 25. And I also just celebrated 4 years with Ethan. It's been busy, but I haven't forgotten about you.

For our anniversary, Ethan and I did some house sitting for his parents and went to dinner by Snoqualmie Falls. It was nice to get away, to do nothing, and have lots of space to move around in quietly. Living in the city feels like you're going nonstop. There's always a friend to hang out with, another event to go to, a different experience to .. you know experience. You can't miss out on anything. And as much as I love that, and so does Ethan, we're getting old. Ha! We like our quiet time, we like our lazy time. 

On Sunday morning, we took over Ethan's mom's kitchen with vigor and determination! It had been a while since either of us had the energy to make something special. Our small little basement gets dirty quickly. It makes it hard for us to want to do anything sometimes, especially when we feel busy. So for breakfast we made sourdough blueberry pancakes.


To make these, you'll need a sourdough starter. I had no idea that you can use the same bacteria strand over and over again, as long as you feed it each time you take away from it. Here is how you can create your own.

Luckily, Ethan's parents have had the same one for YEARS!. He told me that it came from a starter that is over 80 years old. I mean, wow. Who knew?! Food in general just got way cooler for me. It makes me sort of like science...at least for a second. 


These pancakes don't need a lot. You put a little maple syrup and maybe some cinnamon on top and you are good to go! They are sweet and tangy, hearty and delicious! And if you can see... those are some of the fresh blueberries we picked earlier this month at the UPick farm. You can never go wrong with fresh blueberries!

So let's get down to business, here's what you do:


Can you read Ethan's handwriting, I sort of can....


INGREDIENTS

  • 1 cup flour
  • 1 cup sourdough starter
  • 1 egg
  • 1 tablespoon sugar
  • A dash of salt
  • 1-2 tablespoons vegetable oil (really any oil would work...)
  • 1/2 teaspoon baking soda
  • 1 teaspoon water
  • 1 pint blueberries


DIRECTIONS
  • Combine the flour and sourdough start, let it rest over night (it needs to combine and rise, and all that good science stuff...)
  • The next morning, combine the flour & sourdough mixture with the egg and sugar
  • In a medium bowl combine the salt, baking soda, water, and oil
  • Combine both bowls and stir for 30 seconds (you may need to adjust the water amount depending on how thick the batter is)
  • Heat a skillet on medium
  • Using a 1/4 cup measurement, spoon out the batter and sprinkle on the blueberries
  • Cover the blueberries with extra batter before flipping
  • You will know the pancakes are ready to flip when tiny bubbles start sprouting up all over 
  • After you've flipped it, let it cook for 2 minutes. Check to see if the pancake is golden brown. If it is, put it on your plate!
  • Top with maple syrup and a dash of cinnamon, grab your fork, and eat quickly...or slowly....whatever you want
  • Enjoy!


Hope you enjoy this week's edition of Karen's Place. Subscribe below to never miss out. 

P.S. Did you make any of these recipes? Did you make this one? I want to know! Take a picture and tag me on instagram @karenleannkirsch :)

Friday, July 10, 2015

Farm Fresh Blueberry Cardamom Galette

Last weekend, I went to my very first U-Pick Blueberry farm. Ethan's parents took us out to North Bend for the opening day. We got there early, and found that we were not alone in our plans! People poured into the fields with buckets, sun hats, and hilarious conversations to eavesdrop on between the rows of berries. 

We were in the shadow of Mt. Si, and after months of going a million miles an hour in the city, I felt relaxed and clear. 


I had never really experienced anything quite like picking your own food before. While U-Pick is really fun, it's a lot of hard work! I was hot, distracted, and my back started hurting. It made me really start thinking about the folks who provide us fresh berries and produce every day. I'm not sure what would motivate someone to stand out in the hot sun every day, but I do know that we don't support our farmers and their workers enough. 


46 pounds of blueberries later. It was time to play in the creek to cool off, get back home, clean the berries, and split them up between us all. We freezed some and kept some fresh and uncleaned for eating and baking with during the week. 


For Ethan and his family picking berries is a summer tradition that lasts all year!


So, since we had a bazillion berries at our finger tips, it was time to start baking. I've been reading a lot of food magazines lately, and I have to say, if you have never invested in some of these I would! Fine Cooking, Cooking Light, America's Test Kitchen, Food & Wine, are just some of sophisticated resources that have a lot to teach you! The thing about food blogs - including mine - is that you never quite know what you're getting into. This blog is my way of reflection, connecting to my friends, practicing my art, and exploring a new career path. I am not a professional recipe curator (at least not yet!). But these magazines have rigorously tested their recipes, know the best tools, and can help you learn how best to prepare meals. 

Now enter this blueberry cardamom galette, inspired by Fine Cooking and adapted by myself slightly for an added punch ... because, well, cardamom. 


Blueberry Cardamom Galette Adapted from Fine Cooking

Ingredients for the dough:
  • 6-3/4 oz. (1-1/2 cups) unbleached all-purpose flour
  • 2 tsp. granulated sugar
  • 1/2 tsp. table salt
  • 5-1/2 oz. (11 Tbs.) cold, unsalted butter
  • 1 large egg yolk
  • 3 Tbs. whole milk
  • 1/4 tsp cinnamon
  • 1/4 tsp cardamom

Ingredients for the filling:
  • 4 cups blueberries
  • 1/4 cup granulated sugar
  • 2 Tbs. honey
  • 1 tsp. finely grated lemon zest
  • 1 tsp cardamom
  • 1/4 tsp cinnamon
  • 1 Tbs. all-purpose flour
  • Big pinch table salt
  • 1 large egg, beaten well
  • 2 Tbs. granulated sugar

Directions for the dough:
  • Combine the flour, sugar, and salt in a stand mixer fitted with a paddle attachment 
  • Cut the cold butter into 1/2-inch cubes and add them to the flour. 
  • On a low speed, mix the butter and flour until the flour is no longer white and holds together when you clump it with your fingers, this will take 1 to 2 minutes. 
  • In another bowl, mix the egg yolk and milk and then add that to the flour mixture. 
  • On low speed, mix until the dough just comes together
  • Knead the dough on a clean counter working it with the heel of your hand
  •  Wrap the dough in a sheet of plastic wrap as a flat disk, and let it rest in the refrigerator for 15 to 20 minutes (or up to four days) before rolling it out.
  • Before rolling it out, make sure you get the filling ready!

Directions for the filling:

  • Preheat the oven to 350 degrees F and line a baking sheet with parchment
  • Put the blueberries in a large bowl. Toss the fruit with the 1/4 cup granulated sugar and spices.  Add the lemon zest, honey, flour and salt, and toss 

Now it's time to combine and bake:

  • Remove the dough from the refrigerator and let it sit at room temperature for about 5 minutes. Roll the dough out and place on the baking sheet.  
  • Spoon the fruit in the center of the dough round. 
  • Using your fingertips, fold the edges of the dough over some of the fruit to create a rim about 2 inches wide. Work your way all around, pleating the dough as you go.
  • Using a pastry brush or spoon, cover the dough evenly with the beaten egg. Sprinkle the granulated sugar directly on the dough and fruit.
  • Bake the free form pie for 55 minutes, cool completely and serve at room temperature 
And there you have it! A beautifully rustic Blueberry Galette 

Keep enjoying the summer sun everyone! And get yourself to a U-Pick farm ASAP,  you won't regret it. Eat well! Be well! And subscribe below to never miss a beat :)

Thursday, July 2, 2015

Serene's Owl Cake

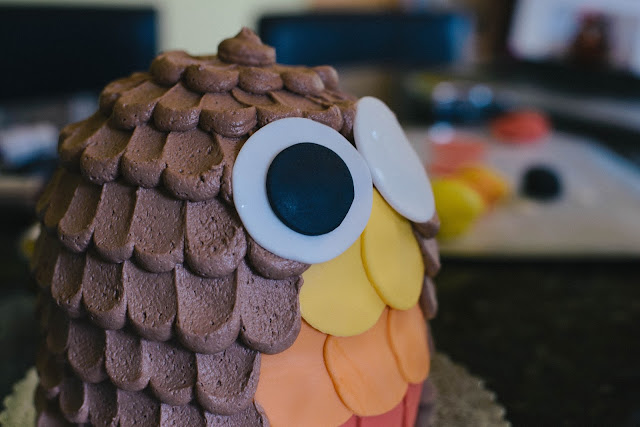
Hello! This week I am going to do something a little different. Instead of giving you a recipe, I'm going to give you a step by step tutorial on how to make your very own, owl cake:


SUPER ADORABLE, RIGHT? If you have the patience or a super creative cake making friend, this is an amazingly straight forward project in the kitchen. 

Enter my friend Serene:


She has been creating crazy cakes since her senior year of high school and it's a hobby that has just sort of stuck. I was her resident advisor in college - she was the kind of resident that kept me sane. Not only is she super cool, she was always down to hang out with me and watch stupid movies. We became good friends, and I always look forward to seeing her. After a recent facebook post where she showed off some wicked cactus cupcakes, I knew that we needed to see each other again. Serene is a project engineer by day and cake master by night. Let's see her process! 

I'll include links to the recipes she used for this below, but for now, prepare yourself to see some bakery magic!


Step 1: Make the 2 round cakes and 1 dome shaped cake the night before and let it cool


Two round cakes will stack on top of each other (with frosting in the middle)
The dome shaped cake will be the top (for the head of course!)

Step 2: Make the peanut butter whipped cream frosting for the middle of the cakes


Step 3: Stack the cakes using the peanut butter frosting and add chocolate chunks for flavor


Step 4: Trim the edges to make everything even and make sure you have a cardboard cake stand that is the same size too


Step 5: Make the peanut butter buttercream frosting for the outside and dye it brown, since owls are brown you know..

`


Step 6: Frost the crumb layer! This means cover the cakes lightly and seal in all the crumbs. The next step will make it prettier.


Step 7: Grab the fondant, make three balls, dye them, roll them out, and using a cookie cutter make the circles for the feathers and eyes.


Step 8: Assemble the circles onto the front of the cakes to create the feathers


Step 9: Frost the cake! Make individual dots and using a flat knife, swipe up


Step 10: Add the eyes!


Step 11: Using your leftover fondant, make the beak and feet


AND THERE YOU GO! YOUR VERY OWN OWL CAKE!


SERENE'S LINKS:


For the buttercream: 
http://joyfullyhome.com/2014/04/owl-cake-tutorial/

For the whipped cream frosting: http://divascancook.com/peanut-butter-cake-recipe-peanut-butter-frosting-easy/  

For the full OWL tutorial: http://joyfullyhome.com/2014/04/owl-cake-tutorial/


Eat well! Be well! And subscribe below for more food adventures from me and my friends :)